When pasting content within the Rich Text Editor, you may use your keyboard shortcut keys, right clicking the mouse or use the Cut, Copy and Paste as Plain Text buttons within the Rich Text Editor tool ribbon.
Pasting Outside Content within the Rich Text Editor
When pasting text from an outside source, always use the “Paste as Plain Text” option, either by right clicking your mouse, Ctrl+shift+V, or using the “Paste Plain Text” button in the ribbon on your Rich Text Editor. Then apply the appropriate style via the left hand style menu.
An "Outside Source" is any document, email or webpage you are copying content from to paste within the editor.
Styles are needed to apply the correct tags to the text that has been pasted or created within the editor. This is to ensure that the correct formatting is applied and consistent throughout the catalog when it is viewed live.
Once you have pasted the plain text:
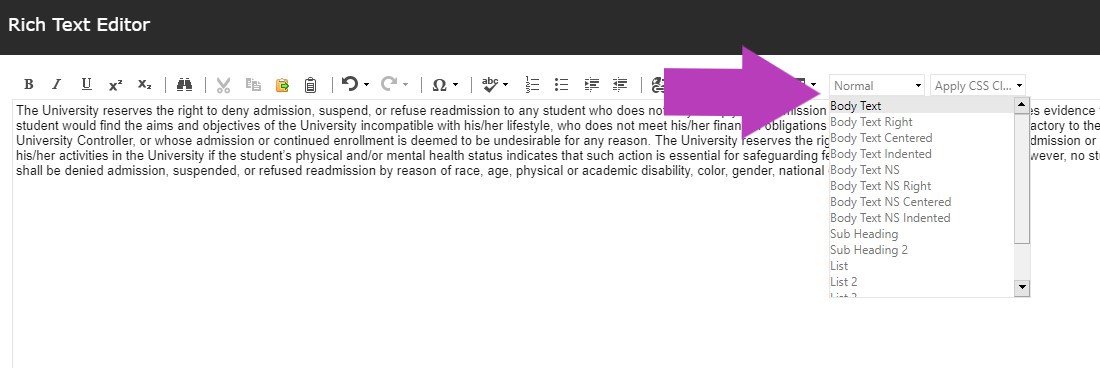
Select the new content by simply clicking into the new content by paragraph; you only need to put the cursor in the appropriate paragraph to apply a style there is no need to highlight it. Styles available via the left hand drop down menu are variations of body text for general content/paragraphs/lines of text. There are SubHeading and Heading styles present within this list to use as well.
The formatting INSIDE the content editor is NOT what it will look like on the website or in print (fonts, etc.) Styles in the content editor display in a generic style for easy identification. The style specific to your institution will be displayed within the web template for the catalog and can be reviewed via Preview when editing. The purpose of styling is to apply the correct tags to text, so the website knows what text needs to apply what style tags.
When it comes to regular Headings (Titles), the position of the item in the content tree determines what heading it will take on, Heading 1, 2, 3, 4, etc. Additionally, the level of the item is reflected in what heading style is applied in the print export. SubHeadings/available Heading tags are to be inserted within the text of an individual item.
Using the left drop down pane, select the style you want to assign the content your cursor is within.
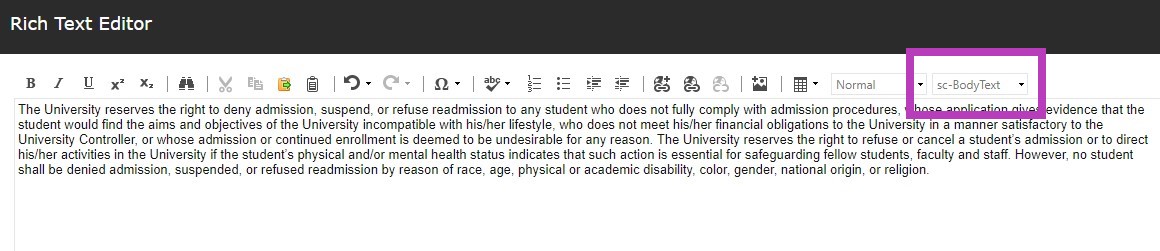
NOTE: The left hand pane will display the style you can apply to the text within the rich text editor; the right hand pane is for informational purposes only and will portray the class the web template will be applying to the text.
If Bold, Italics, or Underline is applied to the text, the right hand pane may not show exactly which style is applied to that text.
These styles are to be used for the general text and subheadings/headings within each page, for lists and tables there are additional buttons to assist in applying the correct styling/formatting.
DO NOT apply styles from the left hand drop down list to text within tables and lists. See Styling Lists or Styling Tables for more information.
Always “Accept” your changes with the Accept button on the lower right hand corner of the rich text editor. And Save your changes with the Save button in the upper left hand corner of your tool ribbon. If you navigate away from the item you have been editing, the system will alert you to save your work.
Note that this will not show on the live site until it is formally approved and published by an admin.
The item being edited is available for editing until submitted through workflow.
Styles in the Rich Text Editor
The following are the most important styles that you will use when editing the bodytext and headings.
NOTE: The web template attaches styling based on the styles you apply. After applying a style, preview the page to see how your change will look on the live site.
All Body Text styles are for the bulk (body) of the content and represent your basic text:
Body Text: This is your most basic style that will be attached to the majority of the text in the Catalog. It will be aligned left with space above the paragraph.
Body Text Right: The text will align right with space above the paragraph.
Body Text Centered: The text will align to the center with space above the paragraph.
Body Text Indented: The text will indent from the left with space above the paragraph. If you want the text to indent please use this style and not the indent tool in the bar at the top. The indent tool is designed for lists only.
Body Text NS: The text will align left with no space between the paragraphs/text.
Body Text NS Right: The text will align right with no space around the paragraphs/text.
Body Text NS Centered: the text will align to the center with no space around the paragraphs/text.
Body Text NS Indented: The text will indent from the left with no space around the paragraphs/text. If you want the text to indent please use this style and not the indent tool in the bar at the top. The indent tool is designed for lists only.
SubHeadings:
SubHeading: Sub Headings help distinguish different sections of the Body Text within the content of one item.
SubHeading 2: This style is used to distinguish a section within a Sub Heading. The style will be smaller and less pronounced then the SubHeading style.
Headings: These can be used instead of SubHeadings and are more accessible.
heading 2: Will style the selected line of text in a header style to break up content within. These will also be styled the same as header 2s within an exported copy.
heading 3: Will further break up content and add a heading 3 within the content of a single page.
heading 4: Will further break up content and add a heading 4 within the content of a single page.
Styling Lists
When text to represent a list has been pasted as plain text, it can be selected and the appropriate style applied using the Number List or the Bullet List buttons provided in the tool ribbon. These buttons automatically format and translate the correct style so the selected list does not need additional styling added via the left hand drop down menu.
One the appropriate style has been applied to the entire list, the Indent and Outdent buttons can be applied to create sublists within the list content.

If you wish to add text indented along with a number or bullet list, place your cursor at the end of the paragraph, hold "Shift" and press "Enter" to create a break in the list without creating a new number or bullet.
NOTE: Do not use the indent and outdent buttons for regular text, use the BodyTextIndented and BodyTextNSIndented styles if you wish to indent regular text (non list content). These buttons are only used for Lists.
Always “Accept” your changes with the Accept button on the lower right hand corner of the rich text editor. And Save your changes with the Save button in the upper left hand corner of your tool ribbon. If you navigate away from the item you have been editing, the system will alert you to save your work.
Note that this will not show on the live site until it is formally approved and published by an admin.
The item being edited is available for editing until submitted through workflow.
Styling Tables
To build a new table within the editor, select the size of the table needed from the table button within the tool ribbon of the rich text editor:

Any content placed within a table cell will automatically acquire the table style and there is no need for additional styling from the left hand dropdown style menu.
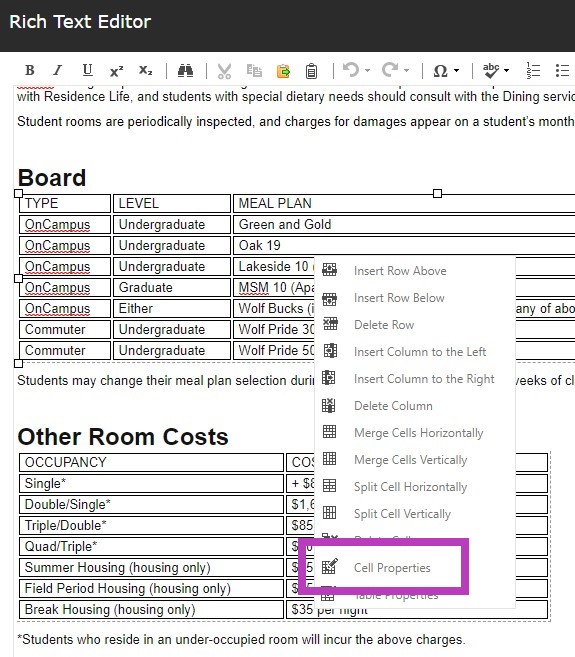
To adjust the structure of the table by adding/deleting new rows and columns, and merging/splitting cells, right click within the table to gain access to more table option buttons.
To change the formatting within the tables, you will want to access the Cell Properties window. From here you can update Borders, coloring, padding and content alignment.
Accessing the Cell Properties window:
When in the rich text editor of a table, right click within any of the cells and select Cell Properties:
To select specific cells, or all cells for styling, use the scroll bar on the left hand side window and either select specific cells to style or click "Select All" at the bottom: (Hold Ctrl to select multiple cells at once)
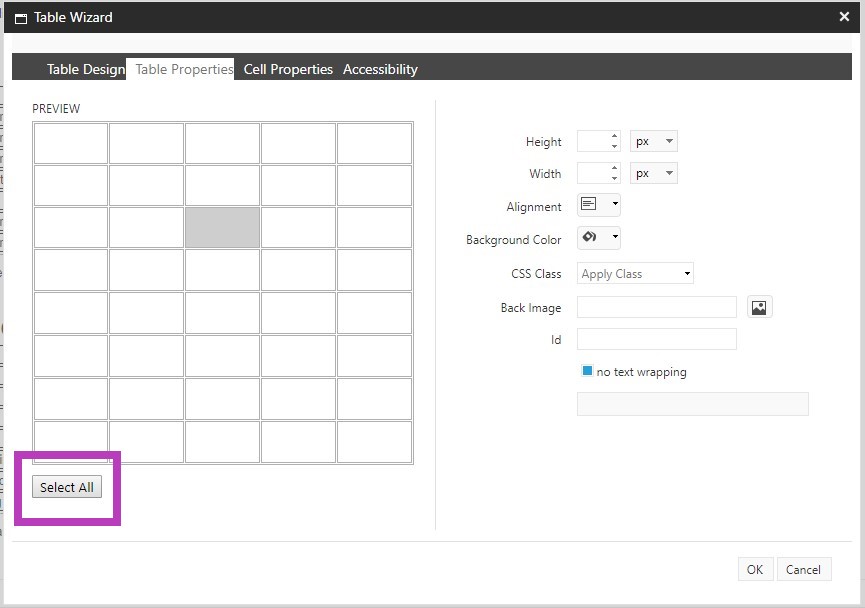
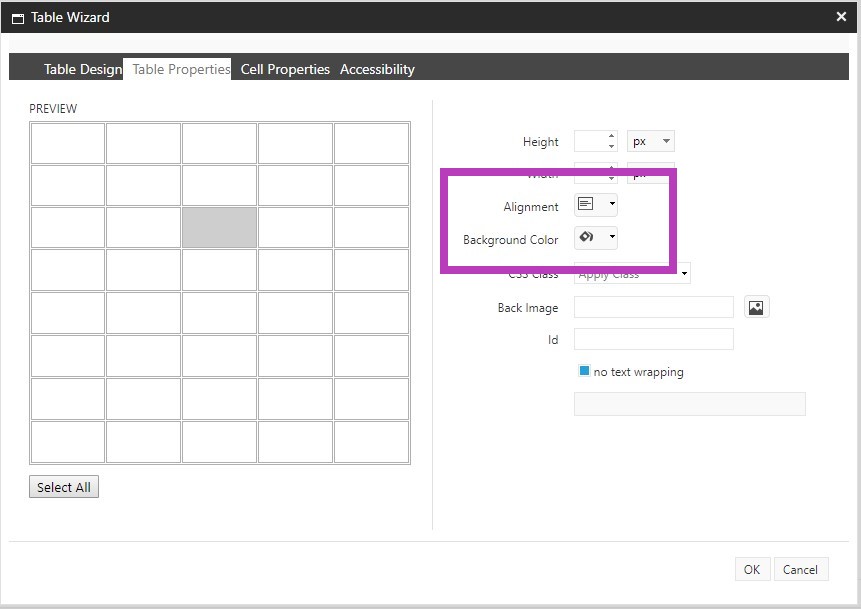
Once the Table Wizard is open and you have the cells selected that will be affected by the styling you wish to apply, you have immediate access to Cell Alignment and Background Color options:
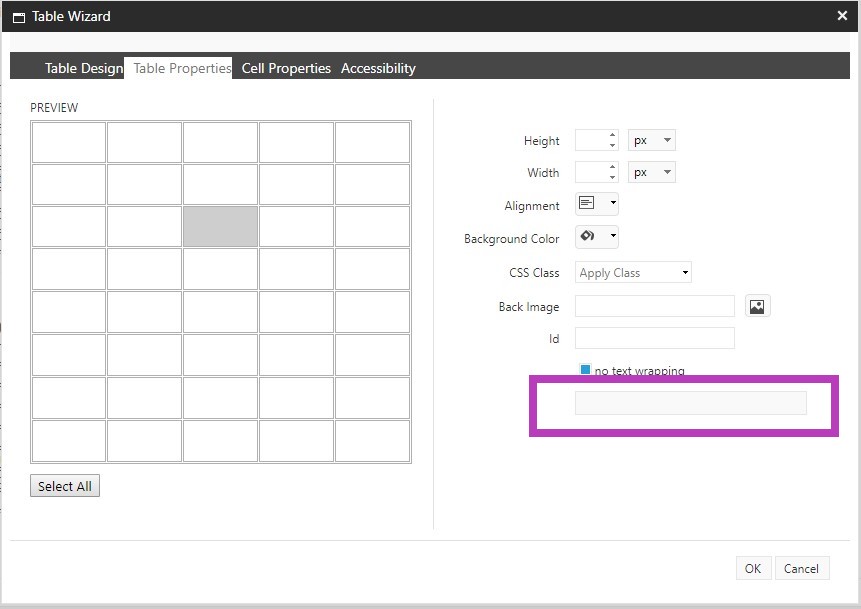
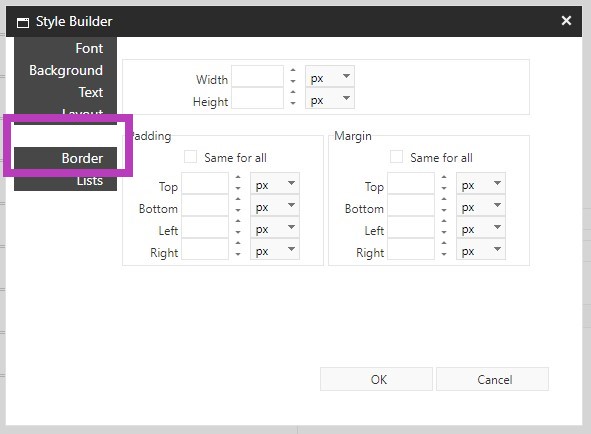
You also have access to click the Style Builder to add Borders or Padding:
Always “Accept” your changes with the Accept button on the lower right hand corner of the rich text editor. And Save your changes with the Save button in the upper left hand corner of your tool ribbon. If you navigate away from the item you have been editing, the system will alert you to save your work.
Note that this will not show on the live site until it is formally approved and published by an admin.
The item being edited is available for editing until submitted through workflow.
Internal Links
Making an Internal Link to another page within the Catalog
- Select the text within the rich text editor that will represent the link on the live catalog page you are editing.
- Once the text is selected, click the “Insert Sitecore Link” button:

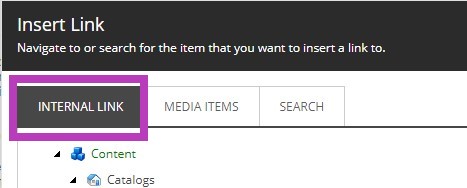
- When the window opens select the item you wish to link to in the content tree displayed under the Internal Link tab.
Note: You may navigate around the tree within the pop up, expanding and collapsing items to find the precise page you need to link to, then select it.
- Click “Insert”.
Making an Internal Link to a PDF/Word doc
- Select the text within the rich text editor that will represent the link on the live catalog page.
- Once the text is selected, click the “Insert Sitecore Link” button
- When the window opens select the “Media Items” tab and expand the content tree until you locate the document you need to link to, select the document and click “Insert".

Notes:
- If you are copying and pasting content from one item to another within the system that have internal links, you may have to recreate these links.
- Internal Links will export as page references when exported to print and the Table of Contents is generated.
- If you are editing an existing link within a Rich Text Editor, right click on the link and select "Remove Link" prior to implementing the new one. Proceed with the same steps above to recreate the new link once the previous link has been removed.
Always “Accept” your changes with the Accept button on the lower right hand corner of the rich text editor. And Save your changes with the Save button in the upper left hand corner of your tool ribbon. If you navigate away from the item you have been editing, the system will alert you to save your work.
Note that this will not show on the live site until it is formally approved and published by an admin.
The item being edited is available for editing until submitted through workflow.
External Links
Making an External Link to an Outside Website
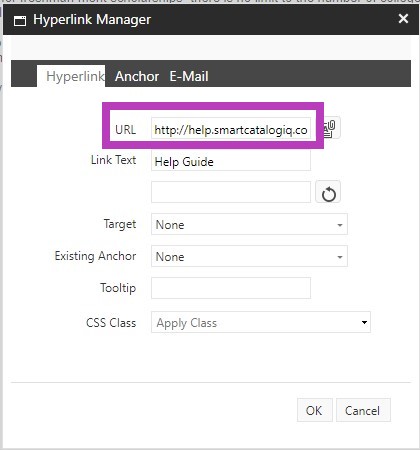
- Highlight the text within the rich text editor that will represent the link on the catalog page.
- Once the text is selected, click the “Hyperlink Manager” button

- Enter the full URL of the page into the URL field.
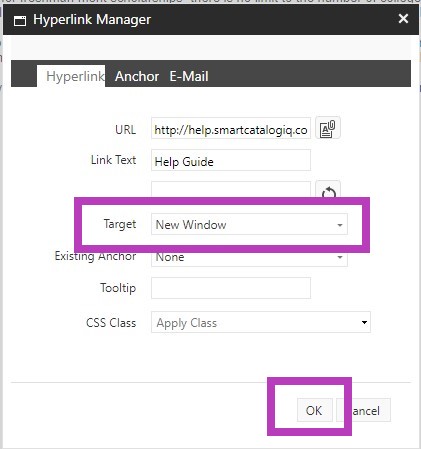
- At this time you would also be able to select a “Target” by selecting one from the drop down menu. If a target is not selected, the default will open the linked page in the same browser window. Click “OK”.
Creating an email link
- Highlight the text within the rich text editor that will represent the email link on the live catalog page.
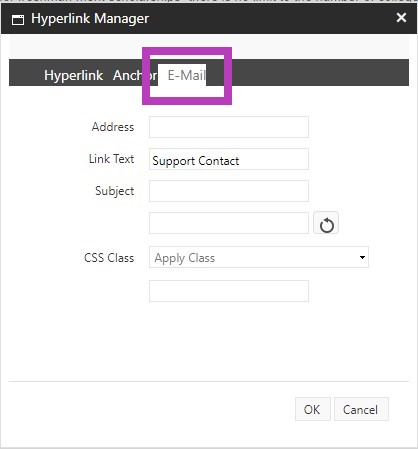
- Once the text is selected, click the “Hyperlink Manager” button
- Click the Email tab:
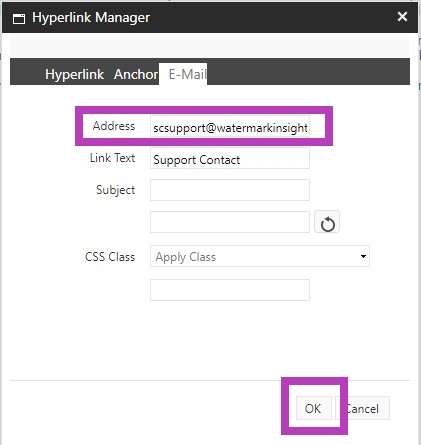
- Fill in the Address field and click “OK”.
Please note, if you are editing an existing link within a Rich Text Editor, right click on the link and select "Remove Link" prior to implementing the new one. Proceed with the same steps above to recreate the new link once the previous link has been removed.
Always “Accept” your changes with the Accept button on the lower right hand corner of the rich text editor. And Save your changes with the Save button in the upper left hand corner of your tool ribbon. If you navigate away from the item you have been editing, the system will alert you to save your work.
Note that this will not show on the live site until it is formally approved and published by an admin.
The item being edited is available for editing until submitted through workflow.
Adding Images
Only Administrators are able to upload images, PDFs, or Word documents into the media library (refer to the Admin User Guide, Media Library). Basic Editors are able to add images that have been uploaded into the Media Library by Administrators.
- Click the Content Editor and select the page you wish the image to be displayed upon. Open the Rich Text Editor for this page by clicking “Show Editor”.
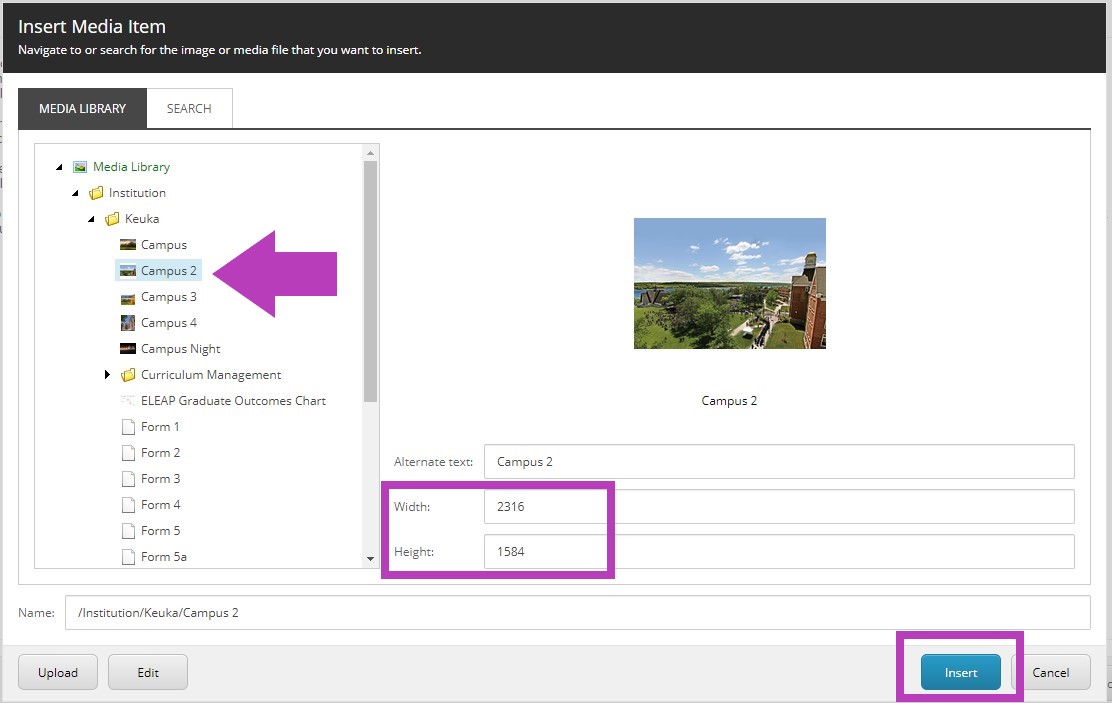
- On the upper right hand side of your ribbon within the editor click on the “Insert Sitecore Media” button.

- Once the window is open, drill down into the content tree on the left hand side and select the media you wish to display.
- You may adjust the width and height once you have selected the image from the left hand tree or just click “Insert” to place image as sized.
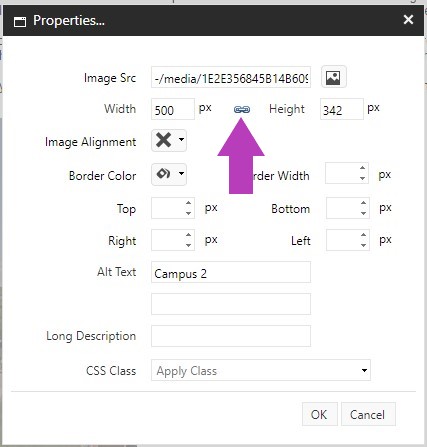
- Once the media is inserted into the editor, you may right click and select Properties/Image Map Editor to alter the appearance of the item. If you wish to change the size of the item in the Properties, click the "broken link" image next to width and height. The image should change to a connected link. This will keep the images proportions consistent. If you do not want the image to keep its original proportions, do not click the "broken link".
- When you are done with your edits, click “Accept”, save your work. Once this page/item has been approved and published, the new image will display on the live catalog site.
Always “Accept” your changes with the Accept button on the lower right hand corner of the rich text editor. And Save your changes with the Save button in the upper left hand corner of your tool ribbon. If you navigate away from the item you have been editing, the system will alert you to save your work.
Note that this will not show on the live site until it is formally approved and published by an admin.
The item being edited is available for editing until submitted through workflow.