What is a Clone?
When an institution has more than one catalog or handbook that have pages in common, there may be an additional catalog within the shared calendar item titled, Shared Content.
Within the Shared Content book, originals of the pages that are shared between the catalogs/handbooks reside. The original items are "cloned" from the Shared Content into the catalogs or handbooks using the "Clone" button. Any edits needed for these items, will be committed within the Shared Content book, which will then automatically update the clones wherever they reside.
All edits should be made to the original item in the Shared Content. If edits are made in a clone and saved, it can break the link to the original item.
If/When the link between the original item and the clone are broken, the resolution is simple.
- Delete the clone from the catalog/handbook that is no longer linked to the original.
- Reclone the item to the catalog/handbook from the Shared Content book.
Editing a Clone
Clones look a little different and have red check-marks on the icon in the content tree. Academic related items will have a + symbol on the icon in the content tree.


Cloned Course Folders and Course items will also have the + symbol, but the icon itself will look different for the course folders:

Additionally, if the item is a clone, a yellow warning bar at the top of the item will show telling you it is a clone and that you need to edit the original item.

Lock & Edit the item in the Shared Content. The shared content item can be edited in the same way as editing a regular item (see Editing Narrative and Academic Items).
Workflow
You will notice that the clones will appear in your workbox along with the item you just locked from the shared content catalog. This is normal.
NOTE: When promoting items through workflow you will want to promote ONLY the shared content item, the clones will automatically be promoted/approved with it. If you promote the clones through workflow separately it will break the link and the clones will have to be recloned (see above).
Another way to view the clones is to imagine the shared content item as a parent and the clones as children. The children will go wherever the parent is, but if you try to separate the child (lock & edit/promote/remove/approve) from the parent it gets lost and you will have to reestablish the link. You only want to deal with the parent and not the children when editing or promoting through workflow, the children will follow it wherever it goes.
Publishing
All items, shared content and clones, will need to be published individually. Publishing will not break the link between the clone and shared content item.
Creating a Clone
NOTE: Only users with the administrator role are able to create clones. If you need an item cloned, contact your administrator to clone the item.
Select the Shared Content item you wish to clone. Under the Configure tab, click the Clone button.

A popup with the content tree will appear. Select the catalog or drill down to the section you wish to place the clone within and select the Clone button in the bottom right of the window.
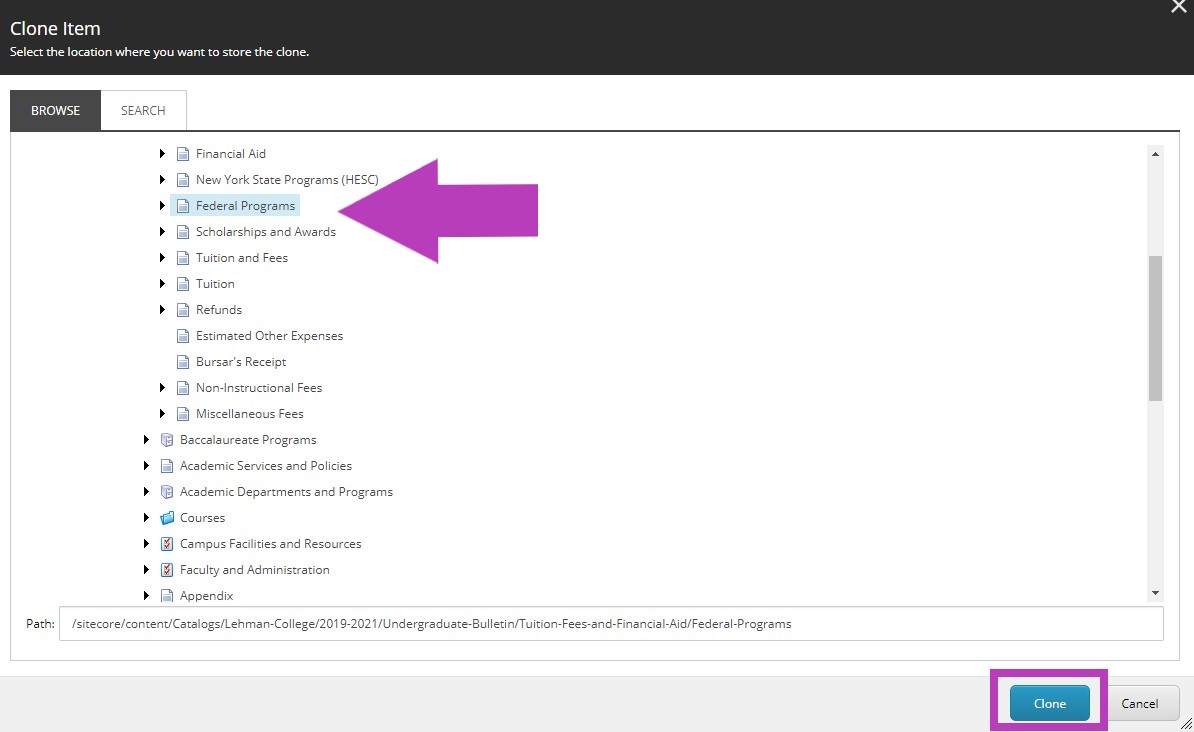
The system will automatically bring you to the clone that was just created.
If you are replacing an existing clone, delete the clone prior to recloning the Shared Content item.
Please Note: If the clone is not deleted prior to adding the new item, the words "copy of" may be in the Rename. You will need to update this Rename field to remove these words or else they will show up in the URL of the clone when you publish.
(Two different items in the system cannot be named the same in the Rename field and because of this rule, it will add the words "copy of" to differentiate them.)
Removing a Clone
To remove the link from the clone to the original, select the clone within the catalog:
Click Unclone within the Configure tab:

This will break the link between the clone and the original yet allow you to keep the catalog item and edit it independently.
Note for Catalog Administrators:
When you request a Rollover from the Watermark Support team and you have Shared Content - all catalogs/handbooks that contain clones from the Shared Content need to be rolled over simultaneously and this rollover must include the Shared Content book as well. This is to ensure that all links from the original items to the clones remain unbroken.
Please ensure that all catalogs/handbooks are ready for the rollover together when requesting this.